Table Of Contents:
Section 3 - Removal Of 5-Speed
Section 4 - Aluminum Flywheel Instillation
Part B - Install Flywheel
Part C - Install Clutch Plate
Part D - Install Pressure Plate
Section 5 - Reinstalling The M5R2 Manual Tranny
Part B - Installing The Driveshaft
Part C - Installing The Exhaust
Part D - Bleeding The Slave Cylinder
Section 6 - Installing Interior Parts
Section 7 - Testing
Part B - Road testing
Section 1 - Introduction
First a little history about the stock flywheels. In 1989 Ford came out with the revolutionary car, the Super Coupe. Unfortunately Ford found out after only three months of 'production' that the Duracast crank they had chosen for their 215hp, 315ft lbs torque car was not sufficient. The stresses the Duracast crank was going through continually snapped and created other problems for the engine; because of this Ford changed the crank over to a Forged setup. Here is the first difference in flywheels in the Super Coupe, cars produced before March 1989 all had Duracast cranks. These cranks are externally balanced by the flywheel (5-speed) or flexplate (AOD). The cars produced from after March 1989 through 1993 all used the same flywheel and clutch assemblies. In 1994 Ford decided to increase contact area of the clutch with their increase in horsepower and torque. They went from an 11" clutch to 11.5".
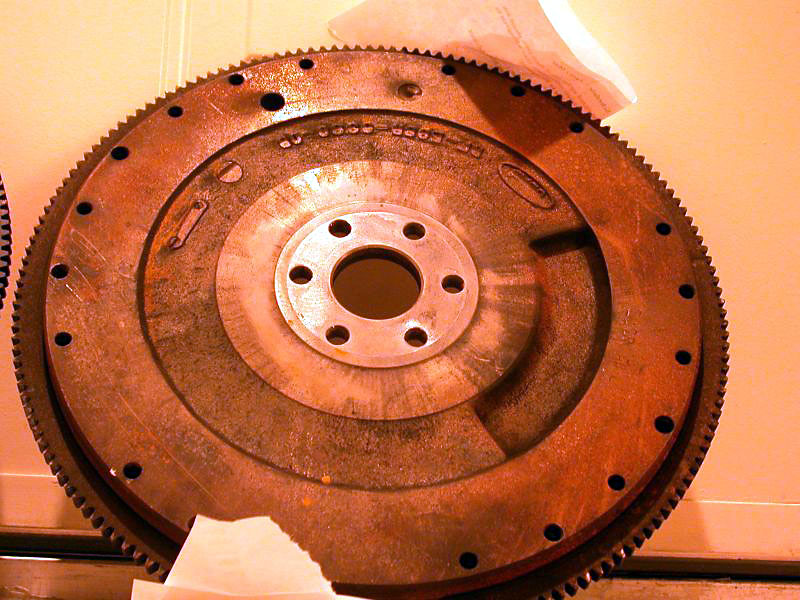
Because of this, it is important you know what you're looking at when you upgrade your flywheel. If your 100% stock and have an early 1989 then your flywheel will look like this. If your SC was produced after March 1989 then it will not have the indention, which is the counterweight for the Duracast crank and is what balances the engine.
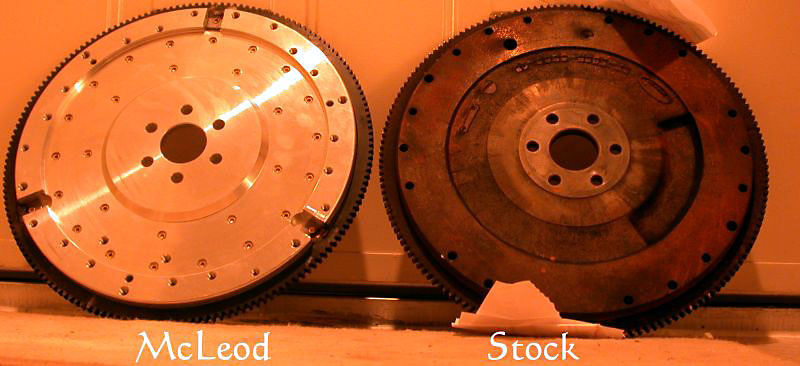
Pictured here is what the McLeod looks like up against the weighted early 89 flywheel. You can really see the difference.
The stock flywheels weights around 30 to 40 pounds, while the McLeod flywheel, a light weight aluminum setup with a steel insert for the contact area, weights only 14 pounds.
The principal of a lighter flywheel is easy to understand. It takes less force to make a light object, say a basketball, than it would a heavier object, say a cannon ball. The principal is the same with the flywheel, it takes less force to rotate the flywheel and therefor you actually acquire more force at the rear wheels. If your drag racing your flywheel's rotational velocity will change at least 8 times in the course of the track (assuming you use four gears). When you accelerate the flywheel speeds up and then each time you shift the flywheel slows down, so for each time you shift gears, you are changing the rotational velocity twice. The less weight you have to turn, the quicker the engine can spin up and the more you can get to the rear wheels.
Ok, that is enough principals, let's get on with the show!
Section 2 - Items needed
PARTS:
TOOLS:
Section 6 - Removal Of 5-Speed
It is advisable for you to do the rest of this interior removal procedure, if not followed you could cause severe damage to the lower shift boot ($150+ from Ford). Remove the two screws in the bottom of the compartment in the center console the two in the middle, and the two at the front. At this point the console should pull up, towards the rear of the car, and out. Once removed pull out the four bolts that hold the lower shift boot to the floorboard.
Unbolt the rear part of the exhaust from the resonator. The easiest way to remove the rest of the rear exhaust is off the black rubber hangers. To do this get some liquid dish washing soap and rub it all over the head of the metal shaft that sticks out of the rubber supports. You can then take a pry bar or long screw driver and gently work the metal hangers out. Be careful and have some supports ready, this unit is heavy and will hurt if it lands on you. Put this part out of the work zone.
Removing the catalytic converters and resonator assembly is a bit more difficult. First, remove the O2 sensor on the passenger side and set it aside. On the driver's side remove the heat shield using a u-joint and ratchet, this will save your knuckles. Now you can see the nuts that are holding the downtubes to the headers. Again, use your U-joint and ratchet to remove the two nuts on each downtub. Go back to the resonator and gently pull towards the back of the car. You will see the hangers that go into the tranny crossmember slowly coming out (you can apply soap here if you want too, but it really isn't necessary). Make sure you have supports because this unit is almost as heavy as the rear part of the exhaust. Put this part out of the work zone.
There are two ways you can remove the driveshaft, the harder way is to drop the gas tank and the rear U-safety cage. The way I prefer, and the way shown here, is to lower the dif. First remove the ABS sensors that are attached to the dif and push them up out of the way. Now you'll need a 15mm combination wrench for the top of the bolt and a ratchet for the nut. I used a 4' long piece of pipe on the end of the ratchet for leverage. Completely remove the front two bolts and loosen the rear two so they have about 1/2" clearance between the nut and the chassis. Make sure you have a smaller jackstand ready and let the dif rotate downwards and rest on it. You will want to lower the dif as far as you can for optimal clearance. It is very heavy and needs to be supported during the rest of this swap. Now pull the driveshaft towards the back of the car pulling the yoke out of the back of the tranny. If you are unable to get it to come all the way out, you'll have more clearance when the tranny starts to come down (more on that later).
Take a piece of cardboard and draw an oval on it and then poke holes around the oval (about 1/2" diameter). This is going to represent your tranny and we are going to put the removed bolts into this. Starting at the top of the tranny take a short ratchet and a 1/2" socket and remove the bolts, working your way down. (Leave the bottom two bolts in). If you didn't disconnect the battery early, you had better do it now. Remove the starter (again 1/2" bolts) and the leads.
Put the tranny jack underneath the M5R2 and strap it down. If you don't have a tranny jack you can use a regular floor jack, it's just a bit harder. Either case, it's important that you strap the tranny to the jack. These things weight a lot and they can easily break bones. I used a cargo-ratchet type strap with a regular floor jack.
Now is the best time to remove the hydraulic line that goes from the master cylinder into the slave cylinder. When you look at the connector at the tranny you can see a white collar. This collar needs to be pushed into the sleeve so it can hit the release springs. Get two small, flat-head screwdrivers and gently push in. Make sure you work your way around and push the collar completely into the sleeve. With a bit of effort you can now pull the line out. Have a small cup or dish handy in case the hydraulic line leaks. If your seals leak then you will need to replace the line.
Now that you have it strapped down remove the last two bolts on the front of the tranny. On the driver's side of the tranny unplug all of the wires. Remove the two bolts that hold the rear crossmember to the chassis.
If your drive shaft didn't come all the way out you will need to gently let the tranny down and work the driveshaft out. You will only need to lower the tranny about 2" to get this accomplished.
Now pull the jack and tranny towards the back of the car. This removes the input shaft from the crankshaft and clutch assembly area. Once you have it cleared, slowly lower the tranny to the floor. If you have problems pulling the tranny out it's because there are two alignment dowels that go from the tranny to the engine block. To get around this problem you can take a pry bar and gently work your way around the outside of the tranny. If you use the oil pan as a pry point do so VERY GENTLY! It's cast aluminum and can break VERY easily.
There are six bolts that hold the pressure plate to the flywheel. If you are going to reuse the old pressure plate you will want to slowly work your way around loosening all 6 bolts a few turns at a time. This will make sure that you keep equal pressure on the release arms in the center of the pressure plate. Be careful during the last few turns, as the pressure plate has no other supports than these bolts. The unit is heavy and can hurt if it hits you or damage other parts of the car. The bolts will not be used again, so discard them.*SAFETY TIP* The stock clutch is still made with asbestos. Asbestos is a health hazard and caution should be used when working around dust. Make sure proper safety equipment is worn.
Section 4 - Aluminum Flywheel Instillation
Get your 6 new flywheel bolts and install the flywheel. It's important that you put locktite on these bolts and they are torqued to specs. The flywheel will require a star pattern to be used when tightening it down to ensure proper seating.
Again, use locktite and tighten the bolts to specs. Make sure the clutch plate is centered with the pilot bearing and inner part of the crankshaft before tightening them all the way down. Again, a star pattern should be used. As you tighten the unit to specs the release fingers will be slowly pressed in by the pressure plate. It is important you follow the star pattern here, or you can create a serious issue with your release fingers.
Section 5 - Installing The M5R2 Manual Tranny
Install the starter and reconnect it's leads.
Attach the rear crossmember to the chassis. Make sure your rubber damper pads are in place. You can now release the strap and remove the jack from under the tranny.
Now pull the driveshaft the rest of the way back till it meats the flange on the front of the dif. Apply locktite and install the four 12mm bolts. If you can fit your torque wrench in there, then tighten them to specs, if not then do a "rough" judgement on it. Reattach the ABS sensors.
Slide the rear exhaust into place. Soap up the hangers and starting with the middle hanger insert it into the black damper. It's a little rough, but with some pressure you can get the hangers into the rubber supports. Then install the rear hangers.
*Safety Tip* Any type of brake fluid is bad for your health and the environment. Extreme caution should be used when messing with this stuff. Don't get it in your eyes our mouth. Wipe it off your skin if you come in contact with it. If you get it on your paint, get it off IMMEDIATELY, because it'll take the paint off. Fill the fluid reservoir with DOT3 brake fluid. Have someone get inside the car to help you bleed the slave cylinder. To do this have an old piece of water house ready and open the top valve. Attach the hose and have the person GENTLY press down on the clutch pedal. After they have the pedal all the way down remove the hose and tighten the valve. Tell them to let up on the pedal. Once the pedal has returned to its upright position loosen the valve, put the house on, and repeat the process. Be sure to check the fluid level and fill if necessary. I found that for every two presses of the clutch pedal I had to fill up the reservoir. If it goes dry, you have to re-bleed the entire system again.
TIP: If the fluid coming out is dirty, continue to bleed the system until it runs clean.
Now we are finished under the car, so go clean up.
Section 6 - Installing The Interior Parts
Tighten down the lower part of the center console.
Reattach the shifter assembly per the way you removed it. Attach the ride control and fog light switches (if so equipped) and attach the beauty plate with the three philips screws.
Section 7 - Testing
Now is the time to test it! Just because you have it installed doesn't mean it's not going to have problems. Listed here are various problems that can occur and solutions to them. All of the following tests can be performed with the car in the air. Please note: you need to make sure the car is SECURED on the jackstands before doing this. Do not get the car in excessive speeds. You can tell a lot about the car just by having the rear-wheels doing 5 to 10 mph.
Use of this document and anything contained within these pages is at the users own risk. By using this information contained herein you shall not hold TBK, TBKHomeworld, or any of it's parties responsible for any damage to your car or injury or death to yourself or any persons, animals, planets, or objects. Please be careful when you perform this work. Follow all safety procedures listed here and everyday safety procedures. USE YOUR BRAIN! Please be kind to the environment and dispose of toxic chemicals and substances properly.