Table Of Contents:
Section 3 - Automatic interior removal
Section 4 - Clutch Pedal Instillation
Section 5 - Master Cylinder Instillation
Section 7 - Clutch Assembly Instillation
Part B - Install Flywheel
Part C - Install Clutch Plate
Part D - Install Pressure Plate
Part E - Install Slave Cylinder
Section 8 - Installing The M5R2 Manual Tranny
Part B - Installing The Driveshaft
Part C - Installing The Exhaust
Part D - Bleeding The Slave Cylinder
Part E - Installing The Wiring Harness
Section 9 - Installing The Interior Parts
Section 10 - Testing
Part B - Road testing
Section 1 - Introduction
This document is setup assuming you will not be driving the car until you get this project done. If your looking for assistance in keeping it driveable for as long as possible please check out this link.
Now, on with the show!
Section 2 - Items needed
PARTS:
TOOLS:
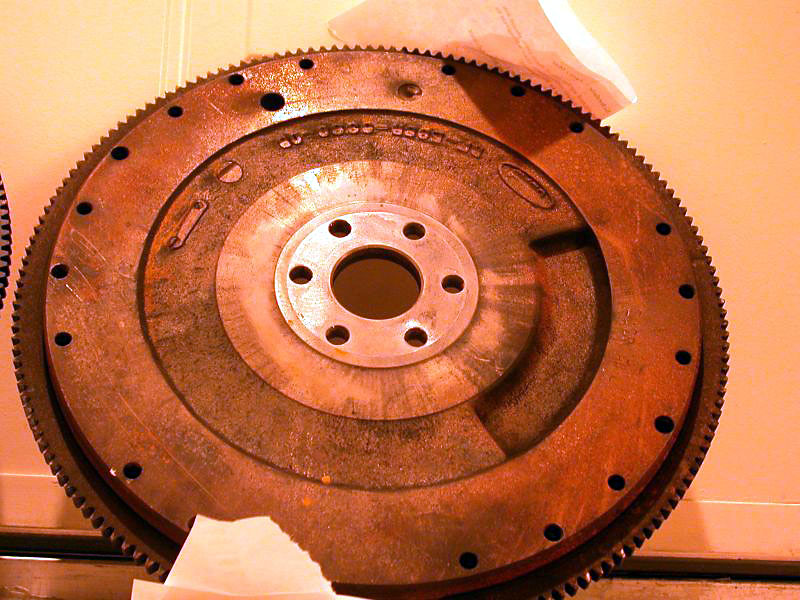
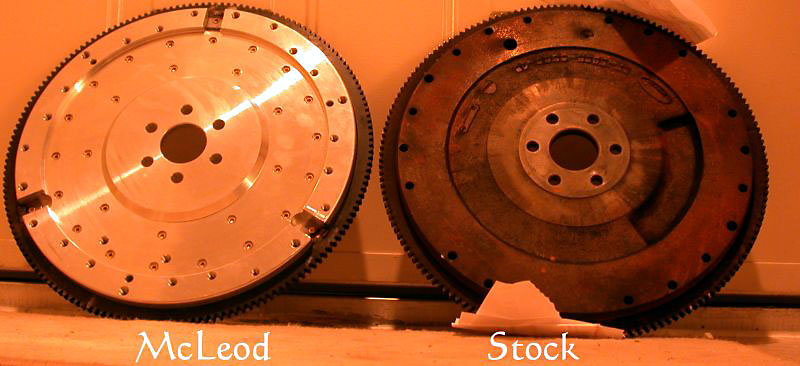
When your looking for the donor car make sure you get the proper flywheel. The 1989 SC had two different cranks. A Duracast and a Forged. The Duracast crank had a weighted flywheel while the Forged crank had a 0 balance flywheel. You can see a picture here of what a Duracast flywheel looks like. Notice the section that has been removed for balancing (on the right). Here is the McLeod 13lb aluminum flywheel beside the weighted flywheel.
Section 3 - Automatic Interior Removal
It's always best to start inside the car, because you're not covered in grease, dirt, or grime just yet. First, remove the driver's seat. When you get the two bolts and two nuts removed tilt the seat towards the back and unplug the 4 wires that connect to the power units on the bottom of the seat. Remove the seat from the vehicle, if space is an issue, lay a thick blanket over the back seat and set it on top of it.
Next open of your glove compartment in the center console. Pull the rubber mat out and you'll find two bolts in the bottom. Remove them. There are three Philips head screws were the door closes, remove these. If you're in a 1989-1993 SC, push the button in on the shifter and pull straight up. If you're in a 1994-1995 there is a release button on the front, push this to remove the shifter. There are 4 pins that hold the front of the center console beauty plate down, two by the shifter and 2 that stick straight into the dash. Pull the E-brake up and gently pull until they snap loose. As you lift the beauty plate up, disconnect the wires to the fog light switch and automatic ride control (if so equipped). Remove the beauty plate and set someplace safe. Remove the 6 bolts that hold the lower portion down, this allows you access to the bolts that hold the shifter boots down. There are four bolts that hold the shifter down, remove these four bolts and unplug the light (you might have to cut or pull back some of the insulating material to see the bolt heads). Pull the shifter up and let it rest in the passenger side floorboard for now (you'll disconnect the cables later). We are done w/the center console for now.
Section 4 - Clutch Pedal Instillation
Here comes the fun part. *Safety tip* Make sure you were your safety goggles or glasses when doing any type of drilling or cutting on metal. Pop the hood and check were the clutch pedal assembly is going to be install that no wires, hoses, or other items are in the way. Attach the flex line to the Dermal and put the 3/8" drill bit in. Center the drill bit in one of the outer dimples and turn the Dermal on. Gently press the bit into the dimple and drill the hole. Make sure not to apply too much pressure or overheat the bit, we will be using this a lot. Continue the process for all of the dimples. I found it easiest to set the dermal on my leg and fish the flex line in through the front of the dash, underneath put a bad angle on the bit and would create un-wanted results.
Now take the rubber seal and make sure they are were you want them. If they aren't, wallow out the holes with the sideways cutting bit. If they are, then confirm your markings for the 2" hole. Remove the rubber seal and drill holes w/the dermal in the parameter of the 2" hole. The more holes you drill, the easier time you are going to have with the sideways cutting bit. Once you're done drilling the holes, install the sideways cutting bit and slowly work your way around. The firewall will vibrate towards the end, this is natural.
Get underneath the dash and look up towards the top of the dash were the clutch pedal is going to be. At the top you'll find some plastic which needs to be cut off. Behind this peace is the none-tapped nut that will be for the top bolt of the clutch pedal assembly. At this point 1989-1992 SCs should remove their brake pedal and install the new one.
Putting the clutch pedal assembly in place is going to be the most difficult part of this entire task. It requires a lot of finesse (no, not the shampoo) and patience to make it in without having to loosen or removing the dash, but it CAN be done. One thing that will help you on this is to remove the pedal and clutch position switch from the assembly. Once you have it in place install three big fender washers and the nuts onto the three studs that go into the engine compartment.
Reattach the clutch pedal and clutch position switch. Attach the wire to the clutch position switch (this should be tapped up to either the main trunk line to over on the driver's side kick panel).
Section 5 - Master Cylinder Instillation
To install the master cylinder you actually have to turn it 45ø clockwise (from engine compartment) to get it to lock in. When you do this, pay careful attention not to break the nipple for the fluid reservoir. I have installed the master cylinder with the hydraulic line installed and with it off. It was much easier with it off, simply because you don't have to bend the ridged plastic hose into place. I'll assume you had to purchase a new hose and have not installed it. If you have, push the little dowel out at the bottom of the master cylinder and pull straight out on the fitting. Make sure you don't loose the rubber washer or it will leak. Look at the tranny install area for installing the hose.
Work the master cylinder down into the area and twist to install it.
The fender that is behind the master cylinder is were the reservoir is to be located. There is already two holes drilled out, simply push the two Christmas tree pins into them. Take the other end of the line and slide it onto the nipple of the master cylinder.
Reassemble the cowel area and install the windshield wiper.
Section 6 - Removal Of AOD
Unbolt the rear part of the exhaust from the resonator. The easiest way to remove the rest of the rear exhaust is off the black rubber hangers. To do this get some liquid dish washing soap and rub it all over the head of the metal shaft that sticks out of the rubber supports. You can then take a pry bar or long screw driver and gently work the metal hangers out. Be careful and have some supports ready, this unit is heavy and will hurt if it lands on you. Put that part of the exhaust out of the way.
Removing the catalytic converters and resonator assembly is a bit more difficult. First, remove the O2 sensor on the passenger side. Set this aside for now. On the driver's side you will have to remove a heat shield. Usage of the U-joints with ratchet will save your knuckles here. Once you get these items removed you can see the nuts that are holding the downtubes to the headers. Again, use your U-joints and ratchet to remove these four nuts. Go back to the resonator and gently pull towards the back of the car. You will see the hangers that go into the tranny crossmember slowly coming out (you can apply soap here if you want too, but it really isn't necessary). Make sure you have supports because this unit is almost as heavy as the rear part of the exhaust. Once removed move it out of the way.
Now, there is two ways you can remove the driveshaft. The harder way is to drop the gas tank and the rear U-safety cage. The way I prefer to do it is to lower the dif. First remove the ABS sensors that are attached to the dif and push them up out of the way. Now you'll need a combination wrench for the top of the bolt and a ratchet for the nut. I used a 4' long piece of pipe on the end of the ratchet for leverage. Completely remove the front two bolts and loosen the rear two about 1/2" clearance. Make sure you have a smaller jackstand ready. The dif is very heavy and needs to be supported during the rest of this swap. You will want to lower the dif as far as you can for optimal clearance. Now pull the driveshaft towards the back of the car. This will pull the front of the driveshaft out of the back of the tranny. If you are unable to get it to come out, you'll have more clearance when the tranny starts to come down (more on that later).
Now that you have it drained you can remove the cooler lines. You'll need two combination wrenches (this goes for anytime you are working with line fittings). First break them loose at the tranny. I found that if you blow in the upper tube the fluid will flow out of the lower tube instead of all over you when you remove them the rest of the way. *SAFETY TIP* Again, this stuff is nasty, don't drink it or try and taste it. You won't like it and it can kill you!
After you have drained the fluid remove the lines from the stock tranny cooler. Put plugs in the tranny cooler inlet and outlet (this is not necessary, but recommended). I pulled the lines from the tranny side of the engine. I found I had more room on this side to negotiate the tight turns. There is a piece of metal just past the engine mount that you have to either remove or open up so you can extract the lines.
At the front of the transmission there is a rubber plug that covers up the torque converter. Removal of this will give you access to the bolts that hold the Flexplate to the torque converter. There are four nuts and you can only get to one at a time. The best way to get to each bolt is to take a ratchet, extension, and socket and turn the engine over via the crank pulley (harmonic balancer) at the front of the engine.
Remove the retaining nut that holds the dipstick up to the block and pull it up and out.
Take a piece of cardboard and draw an oval on it and then poke holes around the oval (about 1/2" diameter). This is going to represent your tranny and we are going to put the bolts we will out into this. Starting at the top of the tranny take a short ratchet and a 1/2" socket and remove the bolts, working your way down. (Leave the bottom two bolts in). Remove the start (again 1/2" bolts) and the leads. If you didn't disconnect the battery early, you had better do it now.
Put the tranny jack underneath the AOD and strap it down. If you don't have a tranny jack you can use a regular floor jack, it's just a bit harder. Either case, it's important that you strap the tranny to the jack. These things weight a lot and they can easily break bones. I used a cargo-ratchet type strap with a regular floor jack.
Now that you have it strapped down remove the last two bolts on the front of the tranny. Go to the driver's side of the tranny and unplug all of the wires and disconnect the shifter cable. If you so desire, you can remove the entire AOD-kick down line that is attached to the throttle body (I would advise doing this). Remove the two bolts that hold the rear crossmember to the chassis.
Gently let down the jack and work the driveshaft out (if it wasn't out already). You will only need to lower the tranny about 2" to get this accomplished. Now pull the jack and tranny towards the back of the car. This removes the input shaft from the crankshaft and Flexplate area. Once you have it cleared, slowly lower the tranny to the floor. If you have problems pulling the tranny out it's because there are two alignment dowels that go from the tranny to the engine block. To get around this problem you can take a pry bar and gently work your way around the outside of the tranny. If you use the oil pan as a pry point do so VERY GENTLY! It's cast aluminum and can break VERY easily.
Now is when you wished you jacked up the car higher! You can remove the tranny from the jack if you need too and pull it out from under the car. If your going to do this, I would advise you to place some cardboard under the tranny so it won't damage the floor or the tranny.
Now you can pull the driveshaft out and set it out of the way.
Section 7 - Clutch Assembly Instillation
Get your 6 new flywheel bolts and install the flywheel. It's important that you put locktite on these bolts and they are torqued to specs.
Again, use locktite and tighten the bolts to specs. Make sure the clutch plate is centered with the pilot bearing and inner part of the crankshaft before tightening them all the way down.
Section 8 - Installing The M5R2 Manual Tranny
Install the 5-speed rear crossmember on the transmission. It's much easier to do this now than when it's under the car.
If you had enough clearance for the AOD to be removed from underneath the car on the floor/tranny jack then you will still have enough for the 5-speed. If you didn't before, then you will need to drag the 5-speed under the car and put it on top of the jack and strap it down. This tranny weighs a lot less, but it's still important you strap it down!
Slowly jack the tranny up, being sure to keep enough clearance for the input shaft of the transmission around the clutch assembly. Once you have the input shaft lined up with the center of the clutch plate push the 5-speed forward. Starting at the bottom of the transmission install the bolts. Remember those pins that you had to pry loose when removing the AOD? Your now having the push them back in place. Do NOT install just one bolt at a time. Install the bolts like you would a wheel....that is in a start pattern. This provides a proper seating of the tranny. Once you get all of the bolts in and the tranny sitting flush against the engine block tighten them to specs.
Install the 5-speed starter.
Attach the rear crossmember to the chassis. Make sure your rubber dampner pads are in place.
Now pull the driveshaft the rest of the way back till it meats the front of the dif. Apply locktite and install the four 12mm 16 point bolts. If you can fit your torque wrench in there, then tighten them to specs. If you can't then do a "ruff" judgement on it. Reattach the ABS sensors.
Slide the rear exhaust into place. Soap up the hangers. I start with the middle hanger first. It's a little rough, but with some pressure you can get the hangers into the rubber supports. Put the two back hangers into their rubber supports.
*Safety Tip* Any type of brake fluid is bad for your health and the environment. Extreme caution should be used when messing with this stuff. Don't get it in your eyes our mouth. Wipe it off your skin if you come in contact with it. If you get it on your paint, get it off IMMEDIATELY, because it'll take the paint off. Fill the fluid reservoir with DOT3 brake fluid. Have someone get inside the car to help you bleed the slave cylinder. To do this have an old piece of water house ready and open the top valve. Attach the hose and have the person GENTLY press down on the clutch pedal. After they have the pedal all the way down remove the hose and tighten the valve. Tell them to let up on the pedal. Once the pedal has returned to its upright position loosen the valve, put the house on, and repeat the process. Be sure to check the fluid level and fill if necessary. I typically found that for every two presses of the clutch pedal I had to fill up the reservoir. If it goes dry, you have to rebleed the entire system again.
TIP: If the fluid coming out is dirty, continue to bleed the system until it runs clean.
You can either lower the car now, or leave it up on the stands for testing. I would leave it on the stands for a few preliminary tests at least.
However, if you must then lower the vehicle back to the ground, making sure you follow the same 'step' procedure.
Now we are finished under the car, so go clean up.
Section 9 - Installing The Interior Parts
Tighten down the lower part of the center console.
The 5-speed center console goes on just like the AOD came off, except you need to attach the shifter handle to the shifter arm. After it's attached you can push the beauty plate into place. Reattach it via the 3 Philip's head screws.
Put the seat back in place and attach the wires. Then tighten it to the floorboard.
Section 10 - Testing
Now is the time to test it! Just because you have it install doesn't mean it's not going to have problems. Listed here are various problems that can occur and solutions to them. All of the following tests can be performed with the car in the air. Please note: you need to make sure the car is SECURED on the jackstands before doing this. Do not get the car in excessive speeds. You can tell a lot about the car just by having the rear-wheels doing 5 to 10 mph.
Use of this document and anything contained within these pages is at the users own risk. By using this information contained herein you shall not hold TBK, TBKHomeworld, or any of it's parties responsible for any damage to your car or injury or death to yourself or any persons, animals, planets, or objects. Please be careful when you perform this work. Follow all safety procedures listed here and everyday safety procedures. USE YOUR BRAIN! Please be kind to the environment and dispose of toxic chemicals and substances properly.